To reinforce the MAC 250 Krypton and Entour head construction, we have implemented slightly different support bends in the front chassis frame and minor construction changes on the modules. The changes significantly reduce the possibility of prism/dimmer modules bending during transport. The changes are implemented in the MAC 250 Krypton from S/N 4037486001 and in the MAC 250 Entour from S/N 4037556001.
Several parts have been modified, so a complete kit, P/N 50300512 “Support bracket kit MAC250 EN", is required to upgrade existing fixtures. The upgrade kit contains the following parts:
- 1 x 23813630 Support bracket (R)MAC250 KR/EN
- 1 x 23813640 Support bracket(L)MAC250 KR/EN
- 1 x 23813650 Support bracket(bottom)MAC250
- 1 x 23809650 Rocker arm right rail, MAC250
- 1 x 23809640 Rocker arm left rail, MAC250
- 2 x 08240128 1/4 turn receptacle 4x13 Black
- 2 x 08230113 5 mm shaft retaining ring
- 8 x 08050700 M3x6 Tapt Ph Torx10 black
Please note that the longer bottom support bracket should only be mounted on the MAC 250 Entour prism/dimmer module, not the Krypton. The bracket is not necessary on the MAC 250 Krypton because of the more rigid sandwich construction of the Krypton's prism/dimmer module.
To modify existing units, first remove the prism/dimmer module from the MAC 250's head, observing all safety warnings and instructions in the user manual.
Install the support brackets as shown in photo below. The support bracket(s) must be mounted with self-tapping screws. The screw holes must be drilled with a diameter of 2.5 mm.
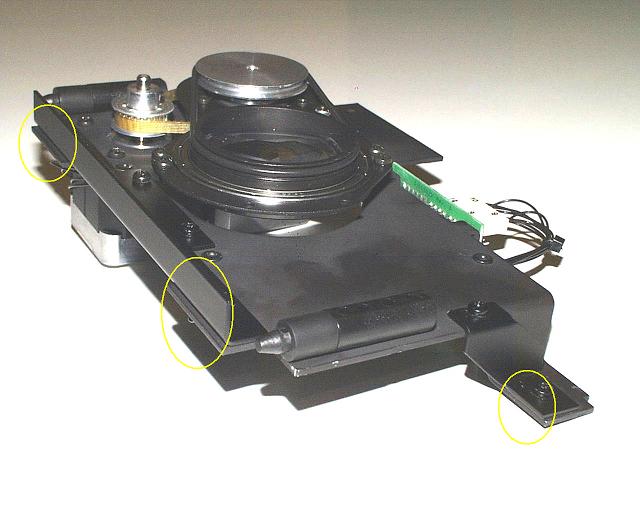
To mount the support bracket plates:
- Hold the support bracket against the plate as shown in the photo below. Make sure that the support plates are flush with the edge of the original module plate as shown in the circles in the photo above. Mark the centers of the mounting holes in the module plate, and drill 2.5 mm diameter holes for the mounting screws.
- Mount the support plates using the screws: P/N: 08050700 "M3x6 Tapt Ph Torx10 black". The screws are taptite, and will cut their own threads in the metal. Be careful not to over-tighten the screws.
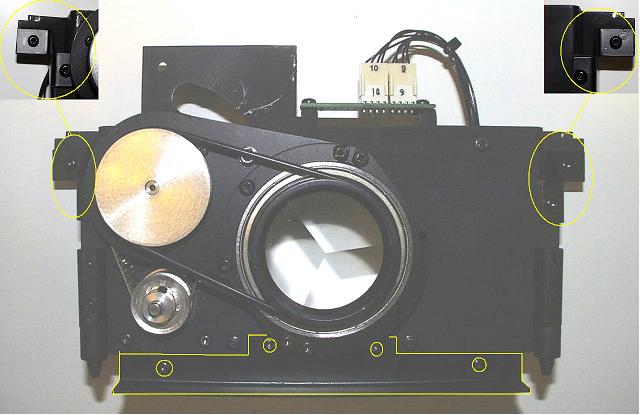
The upgrade kit also contains a new set of rocker arms for the left and right rails on the MAC250. These have been modified with a narrower locking gap that improves locking of the module plate.
To install the new rocker arms:
- Mount the new 1/4-turn screw on the new rocker arm, and lock with the retaining ring.
- Using a 10 mm wrench, remove the brass nut that holds the rocker arm to the chassis frame and remove the rocker arm. Install the new rocker arm, reusing the brass nut to secure it.